Deploy a Webserver VM using Azure CLI and Bash Scripts (Linux/Windows)
Intro
Azure CLI was another tool I had to try right after passing AZ-900 Microsoft Azure Fundamentals Certification, because what are certifications for if it’s not to give a little itching to get your hands a little dirty. Thus, AZ-CLI became my third victim after OCI-CLI and AWS-CLI.
As in my previous CLI tutorials, the aim is to demonstrate how the CLI tool can enrich your IaC experience when combined with powerful shell scripts. What comes along when you test your third CLI tool in a row though, is how easy it is to spot differences with other cloud platforms (expect to see some in this post).
Here’s a direct link to my Github repo with all the scripts: https://github.com/brokedba/az-cli-examples
Here’s also a gif demo to see things in motion: https://bit.ly/3hvTwVu
I. Bash still rocks
With a little patience and few days of debugging bash errors, my interactive scripts can now automate the provisioning of a webserver on 6 different OS (RHEL, Centos, Oracle, Linux, Ubuntu, SUSE, Windows server 2016)
In total, 6 interactive BASH scripts & user-data files were used with Windows turning out to be the nastiest to deploy (I’ll explain why). The code also ensures that required network components like subnet or security group are created if missing during the launch. This will hopefully give beginners a glimpse of AZ-CLI capabilities that make it so handy.
A big shout out to the Stack Overflow community that made my life easier while bash scripting my way to pull this off.
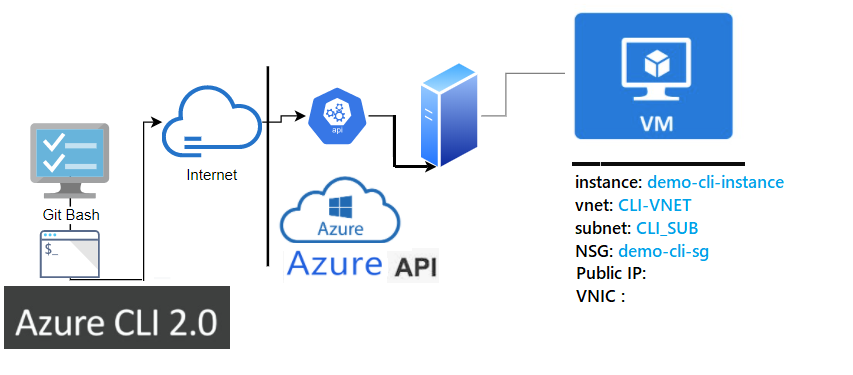
Topology
The following figure shows the layers involved between our workstation and Azure while running the CLI commands.
CLI setup and assumptions
If your CLI environment is not configured yet, go check my previous post (Az-CLI Installation) it’s very easy.
I will assume that the below elements are present/configured in your workstation:
- ssh key pair to attach to your Azure VM. below is the PEM based key pair I generated for this lab
$ ssh-keygen -P "" -t rsa -b 2048 -m pem -f ~/id_rsa_az
     Generating public/private rsa key pair.
 Your identification has been saved in    /home/brokedba/id_rsa_az.
 Your public key has been saved in        /home/brokedba/id_rsa_az.pub.
- The default output is set to the table
$  az config set defaults.output=table
+-----------------------------------------+---------+
|  Name    | Source                       | Value   |
+----------+------------------------------+---------+
| output   | /home/brokedba/.azure/config | table   |
+----------+------------------------------+---------+
- Note: The default region used in this lab will depend on your resource group or the configured region parameter
II. Clone the repository
- Pick an area on your file system and issue the following command.
$ git clone https://github.com/brokedba/az-cli-examples.git
- Below are the files you will find after cloning the directory (with embedded hyperlinks)
$ cd ./az-cli-examples
$ tree
|-- check_az_image.sh      ---> Displays most recent image details per OS type
|-- check_az_vmsize.sh     ---> Displays available vmsize per chosen vcpu number
|-- create_az_instance.sh  ---> Launch a vm (requires a vnet)
|-- create_az_rg.sh        ---> Create a resource group
|-- create_az_subnet.sh    ---> Create a subnet within the VNET
|-- create_az_vnet.sh      ---> Create a VNET+subnet with its security group
|-- cloud-init          ---> Subfolder containing bootstrap code for each OS
    |-- centos_userdata.txt  ---> userdata script for CENTOS 7
    |-- olinux_userdata.txt  ---> userdata script for Oracle linux 7
    |-- rhel_userdata.txt    ---> userdata script for RHEL7
    |-- sles_userdata.txt    ---> userdata script for SUSE 15
    |-- ubto_userdata.txt    ---> userdata script for Ubuntu
    |-- Win_userdata.ps1     ---> PowerShell script for Windows server 2016
III. Deployment
Before starting the deployment let’s first talk about what makes azure architecture different from other cloud platforms
Network:
In Azure, every subnet is a public subnet because as soon as you associate a public IP to a VM’s VNIC, you’ll magically have internet access. Thus, the usual internet gateway is not needed here because system routes are taking care of that. Besides the CIDR range in azure is slightly larger than AWD ( from /8 to /29).
ID: Azure doesn’t provide regular alphanumeric ids for its resources but a sort of path-based identification (see below)
$ SUBNET ID
/subscriptions/xx/resourceGroups/my_group/providers/Microsoft.Network/virtualNetworks/MY-VNET/subnets/My_SUBNET
Naming: Naming is
– Case insensitive (Windows baby ;)!!)
– Unique: A resource group can’t have 2 resources of the same type having the same name
Takeaways:
We can imply from the above that
1- We won’t need to handle ids but just the resource names in our scripts as they are unique within a resource group
2- Route table and internet gateway setting will be replaced by the Public IP and VNICs
1. CREATE A VNET/SUBNET
- The below script creates both VNet and Subnet using default or custom values for their names and CIDR block. I also added checks on the IP/CIDR format. You can click on the Script to see the content.
- Network security group menu will offer to open few ports for you but will also be checked in the VM creation script
brokedba@ ./create_az_vnet.sh
  Name          Location
  ------------  ---------
  brokedba       eastus
  select the resource Group you wish to set for your resources []:
  Enter the VNET name you wish to create [CLI-VPC]:
  selected VNET name : CLI-VCN
  selected group name: brokedba
  Enter the subnet name you wish to add [CLI-SUB]:
  Enter the VNET CIDR to assign '/8-To-/29' [192.0.0.0/8]: 192.0.0.0/8
  Enter the Subnet CIDR to assign within 192.0.0.0/8 to '/29' [192.168.0.0/16]:

  ==== Created VPC details ====
 +---------+------------+---------+--------------+---------------+--------------+
 | VNET    | Vnet_CIDR  | Subnet  |  SUB_CIDR   | Resource_group| Region       |
 +---------+------------+---------+--------------+---------------+--------------+
 | CLI-VNET|192.0.0.0/8 | CLI-SUB |192.168.0.0/16| brokedba    | canadacentral|
 +---------+------------+---------+--------------+---------------+--------------+
 Note: make sure all bytes beyond network prefix length are always zeroed or you'll have an error
************ Security Group ! ************
1) SSH port Only             3) HTTP,RDP, and HTTPS
2) SSH, HTTP, and HTTPS
Select a security group ingress rule and press Enter: 2
*******************  Security Group detail  ******************
+---------------+---------+-------------------+----------------------------+
|    Name       | Source  |   PORT            | Type    |     Priority     |
+---------------+---------+-------------------+---------+------------------+
| Allow-WEB-IN  |Internet | ["22","80","443"] | Inbound |   100            |
+---------------+---------+-------------------+---------+------------------+

SG delete command  ==> az network vnet delete –g brokedba -n CLI-VNET
VPC delete command ==> az network nsg delete  -g brokedba -n sg_CLI-SUB_WEB
Disassociate NSG from its Subnet => az network vnet subnet update --vnet-name CLI-VNET --name CLI-SUB –g brokedba --network-security-group ""
Note:
– If no resource group is detected in your account the script will ask you to create one using create_az_rg.sh
– Delete commands are added in each script so you could destroy/repeat without using the Web Console.
2. CREATE SUBNET (Optional)
- You can also create a subnet for an existing VNet using create_az_subnet.sh script but it’ll only allow it if the VNet has no existing subnet (sorry, too much exception handling due to CIDR overlap in case of existing subnets)
3. LIST VM SIZES (Optional)
- The below menu returns the available VM sizes per picked VCPU number If you to want to replace the default size defined in the create_az_instance.sh script ( $vm_size)
brokedba@ ./check_az_vmsize.sh
******* azure vm shape Selecta ! ************ list all vm sizes in eastus region depending on the CPU and Series selected.
...>> Pick vm size = CPU#
1) 1 VCPU
2) 2 VCPUs
3) 4 VCPUs
4) 8 VCPUs
5)16 VCPUs
Select a number of cores and press Enter: 3
>> Vm compute Series
1) A Series (Entry-level)              3) D Series (General purpose)
2) B Series (burstable)               4) E Series (Optimized for in-memory)
Select a VM series and press Enter: 3
VM              VCPUS    Memory_MB    MaxDisks   OSDisk_maxMB  UserDisk_maxMB
--------------- ------ -------------- ----------- ------------- ----------------
Standard_D4s_v3   4        16384        8           1047552         32768
Standard_D4_v3    4        16384        8           1047552         102400
Standard_D4d_v4   4        16384        8           1047552         153600
Standard_D4_v4    4        16384        8           1047552         0
Standard_D4ds_v4  4        16384        8           1047552         153600
Standard_D4s_v4   4        16384        8           1047552         0
Standard_D4a_v4   4        16384        8           1047552         102400
Standard_D4as_v4  4        16384        8           1047552         32768
Note: The default location is East US. To change it, modify the variable $location at the top of the script.
4. LIST IMAGES (Optional)
- The below menu returns the last available image per OS type. This will help you decide which OS to choose for your VM
brokedba@ ./check_image.sh
******* AWS Image Selecta ! ************
Choose your Destiny ||{**}||
1) RHEL          3) Oracle Linux  5) Windows       7) Exit?
2) CentOS        4) Ubuntu        6) Suse
Select an option and press Enter: 2

Name   Publisher    Sku         Urn                              Version
-----  ----------- ------  -----------------------------------  --------------
CentOS  OpenLogic    7.7   OpenLogic:CentOS:7.7:7.7.2020111300  7.7.2020111300
5. CREATE INSTANCE
- After running the create VNet script, we can now launch our new VM using 6 possible OS’ to choose from.
- The default VM type is “Standard_B1s” but you can give the variable another value if you want.
You’ll be asked to retry if the VNet and Subnet names don’t match and if a subnet is missing, it’ll be created for you.
brokedba@ ./create_instance.sh
******* Azure VM launch ! ************

********** Resource Group ***********
Name         Location
----------- -----------
brokedba     eastus
select the resource Group you wish to set for your resources []: brokedba
Enter the name of your new Instance [Demo-Cli-Instance]: Demo-vm
-----
selected Instance name : Demo-vm Vm size : Standard_B1s
 ********** Network ***********
         **** VNET **** VNET
Vnet_CIDR    Resource_group    Region
--------  -----------  --------------- ----------
CLI-VNET  192.0.0.0/8  brokedba       useast
select the VNET Name for your new instance []: CLI-VNET
selected VNET name : CLI-VNET

**** SUBNET ***
Subnet    CIDR            ResourceGroup
--------  --------------  --------------
CLI-SUB   192.168.0.0/16  brokedba
Select The Subnet for your new instance []: CLI-SUB
selected subnet name :  CLI-SUB
Subnet exist => Checking  the OS menu and Security group rules
...
************ Network security Security Group ! ************
Checking the associated  NSG : sg_CLI-SUB_WEB
== Creating the instance with the below NSG.
{ "Combo_rule_Ports": "["22","80","443"]",
  "Name": "sg_CLI-SUB_WEB",
  "resourceGroup": "brokedba",
  "single_rule_Ports": "[]",
  "sub": [ /subscriptions/…/virtualNetworks/CLI-VNET/subnets/CLI-SUB" ]
}
************ Azure Image Selecta ! **************
Choose your Image ||{**}||
1) RHEL          3) Oracle Linux  5) Windows       7) Abort?
2) CentOS        4) Ubuntu        6) Suse
Select an option and press Enter: 2
Name    Publisher    Sku    Urn                                 Version
------  -----------  -----  ----------------------------------- --------------
CentOS  OpenLogic    7.7    OpenLogic:CentOS:7.7:7.7.2020111300 7.7.2020111300

===== Instance Deployment Detail ========
Selected Subnet name : CLI-SUB
Selected Instance name : Demo-vm
Selected instance Type : Standard_B1s
Selected Security Group: sg_CLI-SUB_WEB
UserName   : centos
Selected OS : CENTOS
...
Public IP creation...
Name           Location       Stat       Allocation
-------------  -------------  ---------  ------------
Demo-vm_pubip  canadacentral  Succeeded  Dynamic
Network interface creation...
Name         State      PrivateIP
-----------  ---------  -----------
Demo-vm_Nic  Succeeded  192.168.0.4

===========================================
Check the status of the new Instance
===========================================
The compute instance is being created. This will take few minutes ...
Enter the Path of your ssh key [~/id_rsa_az.pub]:
selected public key: /home/brokedba/id_rsa_az.pub
ResourceGroup PowerState PublicIpAddress PrivateIpAddress MacAddress  Location
------------- ---------- --------------- ---------------- ----------------- -------
brokedba      VM running  40.85.218.246     192.168.0.4   00-22-48-3B-BE-DB useast

ssh connection to the instance ==> ssh -i /home/brokedba/id_rsa_az centos@40.85.218.246
Your website is ready at this IP :) : http://40.85.218.246

VM termination command ==> az vm delete –g brokedba -n Demo-vm --yes
VNIC termination command ==> az network nic delete –g brokedba -n Demo-vm_Nic
IP termination command ==> az network public-ip delete –g brokedba -n Demo-vm_Pubip
VNET termination command ==> az network vnet delete –g brokedba -n CLI-VNET
Disk termination command ==> az disk delete –g brokedba -n Demo-vm_OsDisk_1_fxxxxxxxx
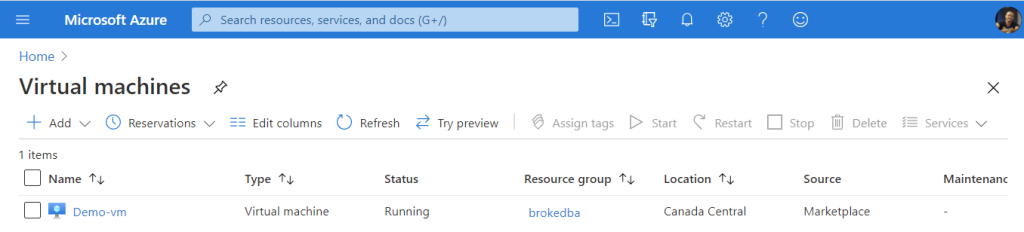
Below is the VM view on your Azure Portal once the instance is provisioned.
6. CONNECTION TO THE VM AND CHECK THE PUBLIC WEBPAGE
- Grab the public IP and enter the private key to connect to your VM using ssh
$ ssh -i /home/brokedba/id_rsa_az centos@40.85.218.246
- Type the Public IP in your browser & check the customized Homepage using the custom-data run during bootstrap
=> http://40.85.218.246
The curious case of Windows VMSs
The “–custom-data” parameter which takes the cloud-init file and sends its encoded content along with the provisioning configuration in azure does it only for Linux VMs. You’ve read right, when providers like AWS offer full cloud-init support in their CLI-tool for all available images including Windows, Microsoft doesn’t for its own OS !!
Azure proposed a cheap option
The only way to replace custom-data run when spinning windows VMs is to remotely invoke commands on the VM after creation (which sucks). I had to add the below line to run my PowerShell custom-data on the VM
az vm run-command invoke -g "$rg_name" -n $instance_name --command-id SetRDPPort
az vm run-command invoke -g "$rg_name" -n $instance_name --command-id RunPowerShellScript
--scripts @cloud-init/Win_userdata.ps1
CONCLUSION
- This exercise helped me to know more about azure architecture than just practicing on a CLI tool and JMESPATH tricks.
- Azure CLI is still powerful, but I have to say that I felt quite a latency all along with my lab even on simple queries where nothing was created. AWS and OCI for instance are way faster in terms of responsiveness (based on my useast tests)
- The fact that a custom route and internet gateway weren’t necessary a reduced my code footprint by almost 30%.
- One caveat for windows provisioning is that Azure doesn’t support cloud-init, but custom code can still run remotely
- Feel free to fork my repository and adapt your own version of these scripts
- Improvement: add the option to add a subnet to VNets with existing subnet to create_az_subnet.sh script
More from this Author
Intro First, before anyone starts sending me print screens about their successful AutoUpgrade, or flexing about how their 100+ databases were smoothly migrated to PDBs over the weekend, I am stopping you right there. This is my honest feedback on the experience I had when trying the tool on a windows environment. It is obviously not... Read More
Intro I have been asked to read about Oracle database fleet management at work but the turnoff was that it relied entirely on OEM. Aggregating both functionalities makes provisioning, in my opinion, cumbersome and unattractive for shops that only want to manage the fleet. Luckily for me, I got acquainted with an even better framework that’s dedicated... Read More